
User manual
Install Remote DSC User — LAN Server & LAN Client
This guide explains how to set up Remote DSC User for an office network (LAN). You install two components in a specific order:
- Remote DSC User — LAN Server — installed on one office server PC. You enter the purchased LAN licence key here. It shares that licence with the other office PCs.
- Remote DSC User — LAN Client — installed on each staff PC that will use Remote DSC, only after the LAN Server is installed and activated. Clients do not enter a licence key.
On this page
1. Before you start
- All PCs (server + clients) should be on the same office LAN / Wi-Fi network.
- You have purchased a LAN Server license and can see the key in My account → My licenses.
- You can sign in to the website to download the installers from My account → Download software.
- Windows may ask for permission when you run the Setup installer. You do not need to run the Remote DSC app as Administrator after install.
2. Download the installers
Sign in to the website, open My account → Download software, and download:
- Remote DSC User — LAN Server (on the server PC)
- Remote DSC User — LAN Client (on each staff PC)
Install Remote DSC User — LAN Server
Do this on the one PC that will act as your office server.
1Download the LAN Server installer
On the server PC, download Remote-DSC-User-LanServer-Setup.exe from My account → Download software.
2Run the installer
Double-click the downloaded Remote-DSC-User-LanServer-Setup.exe. Windows may ask for permission to install. Accept that prompt and finish the wizard. You do not need to open the Remote DSC app as Administrator afterwards.
3Complete the setup wizard
Accept the prompts in the installer and finish the installation. If Windows SmartScreen appears, choose More info → Run anyway (the build is from Hetrim Innovations).
4Launch Remote DSC User (LAN Server)
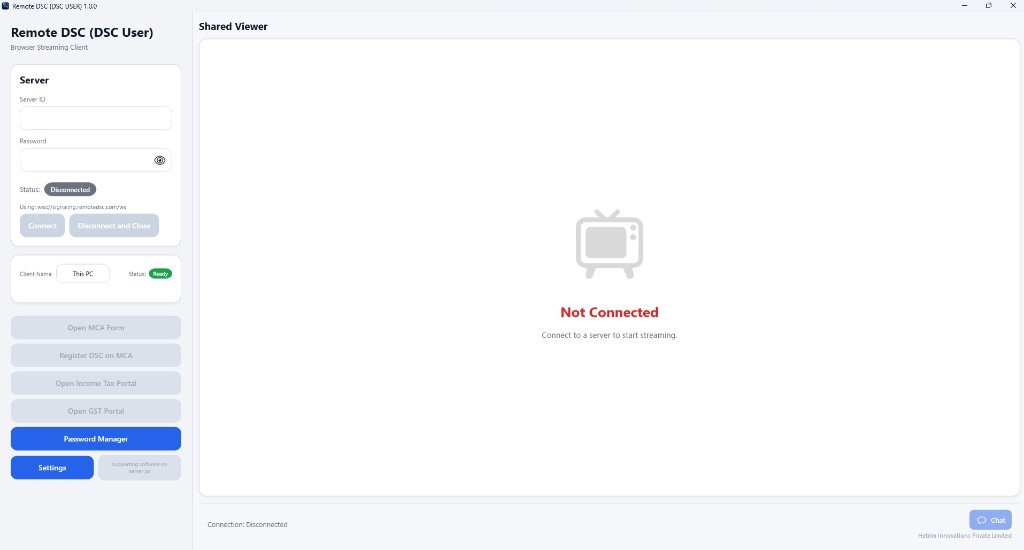
Open the app as a normal user. You will see the main window:
5Activate your license
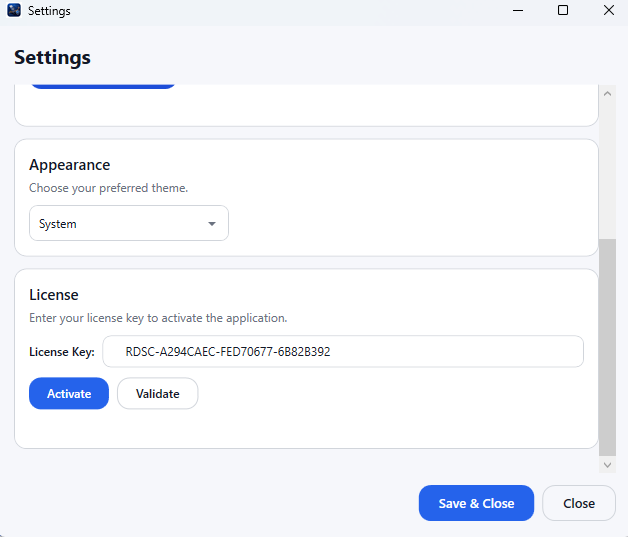
Click Settings (bottom-left), scroll to the License section, paste your LAN Server license key (from My account → My licenses), and click Activate.
Install Remote DSC User — LAN Client
Do this on every staff PC that will use Remote DSC — only after the LAN Server (Part A) is installed and activated.
1Confirm the LAN Server is ready
Make sure the LAN Server PC is switched on, connected to the office network, and its license is active (Part A complete).
2Download the LAN Client installer
On each staff PC, download Remote-DSC-User-LanClient-Setup.exe from My account → Download software.
3Install the LAN Client
Double-click Remote-DSC-User-LanClient-Setup.exe and complete the setup wizard. The LAN Client does not need its own purchased key — it uses the license from your LAN Server on the network.
4Point the Client at the LAN Server
Open Remote DSC User. In Settings, keep Use license from LAN Server selected. Click Auto, or type the LAN Server PC’s IPv4 address (for example 192.168.1.20). Do not type 127.0.0.1 — that is this Client PC, not the Server.
5Connect to the DSC Holder
After the Client can use the office licence, enter the Server ID and Password shown in the Remote DSC Holder app (on the PC where the DSC token is connected), then click Connect. From here the User functions are the same as Single User.
5. Verify the setup
- Server PC: Remote DSC User (LAN Server) is installed and Settings → License shows the key as active (use Validate). The PC is on the office network.
- Client PCs: Remote DSC User (LAN Client) opens, can reach the Server (Auto or the Server IPv4), and can then connect using the Server ID and Password from the Holder.
6. Troubleshooting
- LAN Server won’t activate: Re-enter the LAN Server key in Settings → License and click Activate. Confirm Remote DSC License Hub is Running in Windows Services if clients cannot see the licence.
- Client can’t reach the server: Confirm both PCs are on the same network and the server PC is on. On the Client, type the Server IPv4 (not
127.0.0.1). Allow TCP and UDP 8081 in Windows Firewall if prompted. - “Invalid license” on the server: Make sure you used the LAN Server key (not a Single User key) from My account → My licenses, with no extra spaces.
- SmartScreen / antivirus warning: Choose More info → Run anyway, or follow your organisation’s policy.
Need help?
Contact Hetrim with your edition (LAN Server / LAN Client), version number, and a short description of the issue.